 CMOS-Reset - How to reset the CMOS? (Reset BIOS settings)
CMOS-Reset instructions for PC-Mainboards and Notebooks

- Computer don't boot or freezes during boot process.
- BIOS-Error messages like "CMOS Checksum Error".
- Reset lost BIOS-Password (only PC-Mainboards).
- After making a BIOS-Update (recommendation by many PC-Mainboard manufacturers).
- After inserting a new BIOS-Chip.
There are of course other situations, but the above are by far the most common reasons to make a CMOS reset.
What is CMOS?
On which computers can i reset a BIOS-Password?
CMOS-Reset with Jumper
CMOS-Reset without Jumper
CMOS-Reset did not solved the problem! What can i do?
I assume no liability for the accuracy, completeness or topicality of the following instructions. These instructions describe only in general, how to erase the CMOS on PC-Mainboards and Notebooks. It may be completely different for your computer!
First of all: the CMOS is not the BIOS!
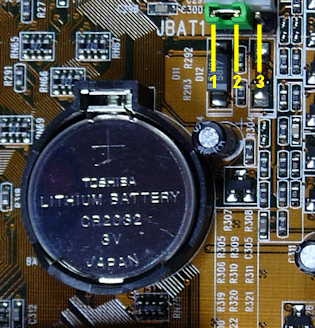
The CMOS (Complementary Metal-Oxide Semiconductor) is a static Random Access Memory (SRAM), which stores the BIOS values. The CMOS will lost its data when removing the voltage/battery (CMOS-Battery, see picture). The duration for a complete loss of data could differs between some seconds, hours, or several days. So it usually won't help to remove the CMOS-Battery for a short time! For this reason, most of all PC-Mainboards have a jumper to immediately reset the CMOS. Notebooks don't have any jumper.
YES, on PC-Mainboards you can clear the BIOS-Boot password resp. BIOS-Setup password by resetting the CMOS.
NO, on Notebooks you can not clear the BIOS-Boot password resp. BIOS-Setup password by resetting the CMOS, because most of all (99%) notebooks have a better theft protection. They have an additional small, hidden IC which stores the password. That means: the password is not stored inside the CMOS! But you can also try to reset the CMOS. Other notebooks are able to store the password on a hidden hard disk sector. Your only chance is to contact the support of your notebook manufacturer. Depending on the manufacturer, you have to send him the serial number of the notebook and you'll get (in many cases free of charge) an individual master password to unlock the notebook. Some other manufacturers even offer only the replacement of the notebook's mainboard - which will be really expensive!
Most mainboard manufacturers have a download section on their websites where you can find the manual of your specific mainboard type. Inside the manual there should be a layout drawing which shows the jumper position.
Read the manual to find out how you can reset the CMOS! Because the procedure can be very different! For instance, most mainboards have to be completely dead, but there are others where you have to reset the CMOS when power is on.
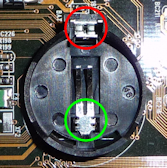
In most cases you can find the jumper (green jumper cap, see picture) nearby the CMOS-Battery. There should be a label like JBAT1, RTCLR, CLRCMOS, CLRCMS, CMOS_CLEAR, Clear RTC, or similar.
There are 4 different CMOS-Jumper types:
3-Pin CMOS-Jumper: The connector strip has 3 pins and the default jumper position is pins 1+2 (see picture). To reset the CMOS move the jumper cap to position pins 2+3.
2-Pin CMOS-Jumper: Depending on the default position, you have to remove or place the jumper.
Soldered points: Sometimes there is no connector strip and you'll only find 2 soldered points which must be bridged (e.g. with a paper clip) to reset the CMOS.
CMOS-Reset-Button: On newer mainboards you'll find different buttons for e.g. Power, Reset and CMOS-Reset. The CMOS-Reset-Button works like a normal CMOS-Reset-Jumper.
- Turn OFF the computer and unplug the power cord (on notebooks remove all accus).
- Press the Power On/Off button (PC-Case) 3-5 times to discharge the mainboard condensers.
- Remove the coin cell battery (CMOS battery).
- Move the CMOS-Jumper to his clear-position (read your mainboard manual to find the jumper).
- Wait ~ 15 seconds (the longer the better).
- Move the CMOS-Jumper to his default position.
- Insert the coin cell battery (CMOS battery).
- Plug the power cord (on notebooks insert all accus).
- Turn ON the computer, enter the BIOS-Setup and load the "Setup Defaults/Optimized Settings".
- Save the BIOS settings and restart the computer.
- No success? Repeat the steps 1-10.
Never turn on the mainboard during a CMOS-Reset!
It could cause a short circuit which would damage your mainboard!
If your mainboard has no jumper (like most of all notebooks) to reset the CMOS, you can try to remove the CMOS-Battery for a few days and hope that this will clear the CMOS. If you don't like to wait, you can try the following instructions, but as I said at your own risk.
- Turn OFF the computer and unplug the power cord (on notebooks remove all accus).
- Press the Power On/Off button (PC-Case) 3-5 times to discharge the mainboard condensers.
- Remove the coin cell battery (CMOS battery).
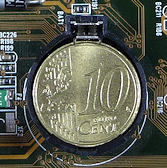
- Insert a 10 Euro Cent coin into the CMOS battery socket (or bridge the +/- contacts with a paper clip).
- Wait ~ 15 seconds (the longer the better).
- Remove the 10 Euro Cent coin (or the paper clip).
- Insert the coin cell battery (CMOS battery).
- Plug the power cord (on notebooks insert all accus).
- Turn ON the computer, enter the BIOS-Setup and load the "Setup Defaults/Optimized Settings".
- Save the BIOS settings and restart the computer.
- No success? Repeat the steps 1-10.
Never turn on the mainboard during a CMOS-Reset!
It could cause a short circuit which would damage your mainboard!
First you should try the following:
- Repeat the CMOS-Reset and increase the time to clear the CMOS from 15 seconds to a few minutes!
- Check the voltage of your CMOS-Battery (~3V).
- Remove all unnecessary additional hardware like e.g. TV-, Sound-, and Controller cards on your PC-Mainboard (not on Notebooks!). You only need CPU, RAM and Graphic adapter!
- If you have more than 1 RAM module, remove the other (maybe one module is defective?).
- Reset the Hardware table (DMI):
the DMI (Desktop Management Interface) manages the integration of various hardware in a computer. Sometimes the DMI data table gets corrupted and you could try to reset it.
Remove the following hardware components:
- RAM
- Graphic adapter (on Desktop-PCs!)
- all drives like Harddisk, CD, DVD, Floppy, (on Notebooks remove only the Harddisk!)
- TV-, Sound-, and Controller cards, etc. (on Desktop-PCs!)
Power off the computer, insert all hardware components and restart the computer.
Note: if a working BIOS recognizes that some components are missed, the BIOS automatically scans for new hardware and refreshes the DMI hardware table.
Nothing works?
- Check all cable connections.
- Check all components and remove any existing dirt.
- Replace CPU, Graphic adapter and the Power Supply Unit. Or use a second PC to check these components.
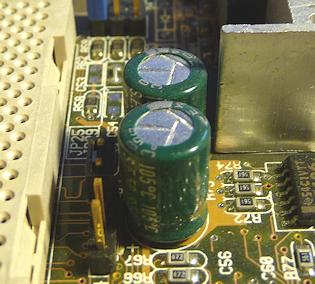 Check all Electrolytic Condensers.
An electrolytic condenser is a cylindrical electronic component that stores electricity.
The cylinder is mostly green, blue or black, and has a pressed aluminum cover.
On older mainboards, it often happened, that the condensers get faulty. In most cases you can identify a defective condenser, when fluid leaked out of the cover, or when the cylinder itself is arched.
In other customers shopping cart
Einträge: 47
padayappa 13.May.2015 09:23very very useful infomation thanks very much
srikar 5.Apr.2015 17:33Thanks.it works
saeed 16.Jan.2015 18:29hi,i have GA-P43T-ES3G rev 1.3 i have boot loop too after i upgrade bios version with @bios program ..i do every things u say in this page but don't fix it.. i clear cmos with jumper and remove battery but problem don't fix..what can i do now please help me thank you.
stefan 16.Jan.2015 14:20I have a problem with bios. works only in clear bios mode 1-2 pin, doesnt work on 2-3 mode in 2-3 mode power on but no screen. in 1-2 pin work but hdd and dvd doesnt recognize. I need help?
Daniel 13.Jan.2015 08:48Thank you! Thank you!
mohamed bamba 1.Jan.2015 22:50very very useful infomation thanks very mush
ApprenticeTechnician 22.Nov.2014 20:09Interesting reading and clear instructions - thank you for taking the time to make this article.
Robert MacClay 22.Nov.2014 14:57Thanks a lot you have saved my MB. The PC showed no signs of life, I changed the memory, video and the processor. The bios reset had been left on the reset position pins 2 and 3, I changed it to pins 1 and 2, still no life but followed your procedure, removing the battery first etc (I replaced the battery) The PC is working perfectly. I have been unable to obtain a manual for the Packard Bell BENGAL MB but pin 1 is indicated by the thicker white line as most sockets are. Thanks again.
byru 3.Sep.2014 02:21Gracias lo use hoy y funciona perfecto
mahmoud 3.May.2014 15:58i want the location of the bios-chips on notebook hp 6910p
mjordan 30.Dec.2013 01:39Tnx. It was a good help....
biosflash 10.Nov.2013 18:25@shafiq
Please contact the ASUS support.
shafiq 10.Nov.2013 16:58i forgot asus 502c laptop bios password
Patteson Seama 9.Oct.2013 02:36thanks for the information I think I found a solution here
biosflash 6.Oct.2013 14:33@David stef
Please contact the Sony support.
David stef 6.Oct.2013 14:19I HAVE VAIO LAPTOP (PCG-7A2L)and I FORGET Password setup it. please help me. thank you.
biosflash 29.Jun.2013 07:03@dude
No way. Please contact the ASUS support.
dude 29.Jun.2013 06:15I have an assus Eee pc 1015b and i try all and password keeps on. Can you help me? Thanks SN:B404BC158901 vn:9264
shabir 25.Apr.2013 21:26thanks to all for this site
biosflash 19.Feb.2013 18:17@farhanqadeer
Driver and BIOS: http://support.ts.fujitsu.com/download/index.asp?lng=EN&Level1=&LNID=5566
Most wanted
BIOS Beeps BIOS Boot CD BIOS Boot Diskette BIOS Boot Logo BIOS Boot USB Stick BIOS Chip installation removal Programming BIOS Chip Type list CMOS Reset BIOS Help BIOS ID BIOS Passwords BIOS Software Tools 3. Start the BIOS Update 4. BIOS Update failed? BIOS Update Howto 2. Choose BIOS Update method 1. Preparation BIOS Updates, Drivers, Manuals, etc. Online Shop
Favorite items


