- Error message: "CMOS Checksum Error"
- Error message: "BIOS ROM Checksum Error"
- Error message: "1394 GUID are invalid in both CMOS and Flash"
- Error message: "MAC address are invalid in both CMOS and Flash"
2. To use a USB keyboard under DOS, the option USB Legacy Support must be activated in the BIOS setup!
Error message: "CMOS Checksum Error"
First of all, the CMOS is not the BIOS. It's only a memory IC which stores the BIOS setup settings of the mainboard.
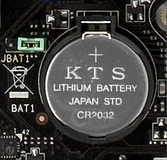
The CMOS (Complementary Metal-Oxide Semiconductor) is rather a battery-buffered, static, thus volatile memory module (SRAM), in which the BIOS parameters are stored, and sits recently in the Southbridge together with other controllers (SATA, USB, ... ), sensors, real-time clock, etc. The BIOS software generates a checksum over the whole CMOS data content to ensure the integrity of the CMOS data. The CMOS memory loses its contents (data) when the backup battery (CMOS battery, see picture) is removed or the battery has become empty with the years. This causes the motherboard to lose its configuration (date, time, CPU, RAM settings, boot order, etc.) and issue the error message "CMOS Checksum Error".
Troubleshooting:
1. Perform a CMOS-Reset!
2. Check the contact and the voltage (~3V) of the CMOS battery. If the voltage is below ~2V, the battery should be changed.
3. If the voltage is still above ~ 2.7V, the battery should be ok, and a major hardware defect could be present. In some cases it could also be a defective BIOS-Chip (which can be easily replaced if it is socketed and not soldered). Or worse: it's a defective mainboard (defective CMOS memory, or Southbridge).

CMOS-Battery, e.g. CR2032 button cell
Error message: "BIOS ROM Checksum Error"
A checksum is formed over the entire data content of the BIOS-Chip and was stored inside the BIOS-Chip itself, or in the CMOS memory. When the PC is booting up, the BIOS software reads out its own data content, generates again a checksum and compares this checksum with the already stored checksum. If the checksums differ, the error message "BIOS ROM Checksum Error" or "Bad BIOS Checksum" occurs.
Troubleshooting:
1. Perform a CMOS-Reset!
2. Maybe it's only a defective BIOS-Chip (which can be easily replaced, if it is socketed and not soldered). Or worse: it's a defective mainboard (defective CMOS memory, or Southbridge).
3. In rare cases, it could also be a BIOS virus, which has changed the data content of the BIOS-Chip.
Error message: "1394 GUID are invalid in both CMOS and Flash"
After a BIOS-Update, or the use of a newly programmed BIOS-Chip, the error message "1394 GUID are invalid in both CMOS and Flash" sometimes occurs.
This 1394-FireWire error message occurs mainly on some ASROCK motherboards, and the ASROCK Support provides the file fwguid.exe, which must be run under DOS, to correct the error.
There are 2 ways to fix the error:
Troubleshooting: a ready-to-use ISO file for a bootable CD:
1. Unzip 1394GUID.zip, and burn the ISO file GUID_005.iso, as an ISO image to a CD or CD-RW (no DVD!), with a burning software that supports ISO images, like the free CDBurnerXP.
Attention: take the CDBurnerXP version, without installCore or OpenCandy! (Adware!)
2. Go to number 3.
Troubleshooting: create your own bootable medium:
1. Create a bootable DOS diskette/CD/USB pendrive.
2. Unzip fwguid.zip and copy the fwguid.exe to the bootable medium.
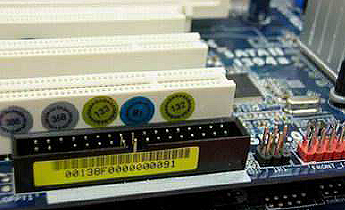
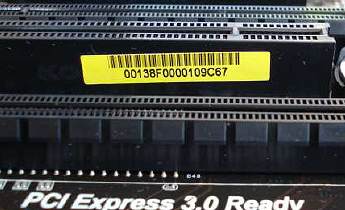
3. On the mainboard, find the sticker with the 1394-ID (see pictures) and write it down.
4. Boot from the bootable medium and insert the following command at the DOS cursor:
fwguid c 1394-GUID and press ENTER.
Attention: instead of 1394-GUID you must insert your own 1394-ID from the mainboard sticker!
(Complete example call: fwguid c 00138F0000000091)
5. A success message like "Write GUID function call OK" should appear, and after a restart everything should be ok again.

1394-GUID Sticker on Floppy connector

1394-GUID Sticker on PCI-Slot
The 1394-ID is a 16-digit serial number (8 bytes), e.g. 00138F0000000091, and is located on a sticker.
Error message: "MAC address are invalid in both CMOS and Flash"
The error message "MAC address are invalid in both CMOS and Flash" sometimes appears on ASUS and ASROCK mainboards after a BIOS update, or after a newly programmed BIOS chip has been inserted.
The BIOS update files are taken directly from the mainboard manufacturer, e.g. from ASUS or ASROCK, so these files can not contain a unique network address (MAC), otherwise all motherboards would have the same MAC address after a BIOS update. Normally, the BIOS should determine the lack of the MAC address during the boot process, and should be able to get this address from the network card to insert it into the BIOS. Unfortunately, for some reason this is not always correct.
There are 2 ways to fix the error:
Troubleshooting: with DMI Tool:
1. Create a bootable DOS diskette/CD/USB pendrive.
2. Unzip macfix_dmi.zip and copy the dmi.exe to the bootable medium.
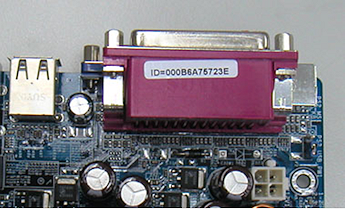
3. On the mainboard, find the sticker with the MAC address (see picture) and write it down. The sticker can be located anywhere on the mainboard, where space is available. Nevertheless, I would first look near the network adapter.
4. Boot from the bootable medium and insert the following command at the DOS cursor:
dmi /o 1 "MACADDRESS" (including the quotation marks!) and press ENTER.
Attention: instead of MACADDRESS you must insert your own MAC address from the mainboard sticker!
(Complete example call: dmi /o 1 "000B6A75723E")
5. A success message like "successful" should appear, and after a restart everything should be ok again.
Troubleshooting: with ASROCK MAC Address Writer Tool:
1. Create a bootable DOS diskette/CD/USB pendrive.
2. Download Asrock MAC Address Writer Tool:
- If your mainboard is new, or just a few years old: mac207A.zip
- If your mainboard is older than a few years: mac161B.zip or mac117f_T.zip
3. Extract all files and directories to the bootable medium.
4. On the mainboard, find the sticker with the MAC address (see picture) and write it down. The sticker can be located anywhere on the mainboard, where space is available. Nevertheless, I would first look near the network adapter.
5. Boot from the bootable medium and insert the following command at the DOS cursor:
mac c MACADDRESS and press ENTER.
Attention: instead of MACADDRESS you must insert your own MAC address from the mainboard sticker!
(Complete example call: mac c M000B6A75723E)
6. A success message like "done" or "successful" should appear, and after a restart everything should be ok again.

Sticker MAC-Address
The MAC-Address is a 12-digit serial number (6 Bytes), e.g. 000B6A75723E, and is located on a sticker.
If necessary, there is still a 3rd possibility to enter a MAC address to restore a network connection (but the BIOS error message is still displayed).
Troubleshooting: with WINDOWS Device Manager:
1. Open the Device Manager under "System Control".
2. Select under "Network Adapter" the appropriate network adapter (eg "Intel® 82579V Gigabit Network Connection" or "Realtek PCIe GBE Family Controller").
3. Right-click "Properties / Advanced / Settings".
4. Enter the 12-digit MAC address under "locally managed address" and confirm with OK.
5. Restart the PC.
Where can I find the MAC address?
1. The MAC address is a 12-digit serial number (6 bytes), e.g. 000B6A75723E, and is often located on a sticker near the rear back panel connectors (for LAN, monitor, USB, audio, etc.), or the MAC address is located at a free spot on the outside edge of the motherboard.
2. Inside the Internet router, this MAC address should also be traceable. E.g. on a Fritz!Box router the MAC address can be found under: "Home network / Network / Name of your PC/Notebook".
Download: MAC Tools (MAC Address Writer v1.17F, v1.61B, v2.07A)
FAQ: How to write MAC address of your motherboard?(6/1/2016)
Mirror biosflash.com: MAC Tools (MAC Address Writer v1.17F, v1.61B, v2.07A)
In other customers shopping cart
Einträge: 3
Williams 22.Feb.2022 05:12Very good one
pcp04 21.Mar.2021 19:23Gracias es lo que estaba buscando para arreglar el problema de la MAC
pasarayaneh 13.Jan.2021 17:08Thank you very much
Most wanted
BIOS Beeps BIOS Boot CD BIOS Boot Diskette BIOS Boot Logo BIOS Boot USB Stick BIOS Chip installation removal Programming BIOS Chip Type list CMOS Reset BIOS Help BIOS ID BIOS Passwords BIOS Software Tools 3. Start the BIOS Update 4. BIOS Update failed? BIOS Update Howto 2. Choose BIOS Update method 1. Preparation BIOS Updates, Drivers, Manuals, etc. Online Shop
Favorite items


