 BIOS Boot-USB-Stick - Howto: BIOS-Update per bootable USB-Stick
A guidance how to create a bootable USB-Stick / Pendrive (incl. MS-DOS system files) to perform a BIOS update.
see also: BIOS-Update Howto: step-by-step instruction
see also: BIOS Update per bootable CD
see also: BIOS Update per DOS-Boot-Diskette
Requirements
- OS: Windows XP, Vista, 7, 8, 10.
- The Laptop-/Mainboard-BIOS must support bootable USB-Sticks - which should apply to most of all modells which are not older than 4-5 years. If an USB-Stick was recognized during the boot process, the BIOS will integrate it as a removable drive, or as a normal drive.
The following tools are needed:
- Ultimate BIOS-Boot-Edition:
- usbdos (folder contains the 3 hidden! MS-DOS system files command.com, io.sys and msdos.sys)
- HP_USB_Disk_Storage_Format_Tool v2.2.3.exe (Hewlett-Packard's Format-Utility for USB-Sticks)
DOWNLOAD Ultimate BIOS-Boot-Edition - 1.2MB - Flashtool - BIOS-Programming-Software (.EXE as file extension), which programs the BIOS file onto the BIOS-Chip, and the BIOS file. Both files must be downloaded:
- Mainboard, bought in its original box: from the mainboard manufacturer website, or
- Notebook or brand PC: from the notebook/brand PC manufacturer website.
Both files must be specially designed for the DOS Operation system! If the manufacturer offers only files for Windows, you have to risk the BIOS update either directly under Windows, or you can re-program your old BIOS-Chip, or purchase a new, programmed BIOS-Chip.
Instruction to create a bootable USB-Stick
- Open the Ultimate BIOS-Boot-Edition and the folder boot_usb_stick.
- Copy the folder usbdos to your hard disk.
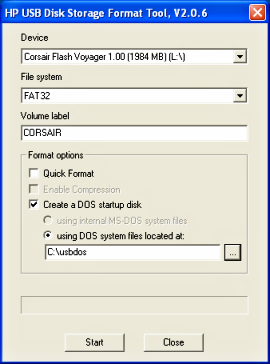
- Start the HP USB Disk Storage Format Tool.
- Select your USB-Stick under Device.
- Choose FAT-32 under File system and activate the check mark Create a DOS startup disk.
- Insert the path to your usbdos folder under using DOS system files located at:.
- Press the Start button and wait until the tool has formatted the USB-Stick and has copied the 3 system files.
- Rename the filename of your flashtool and the BIOS file, if they have more than 8 characters (not the file extension!).
- Copy your flashtool and the BIOS file onto the USB-Stick.
Starting the BIOS-Update from USB-Stick
-
First, go into your BIOS-Setup and change the Bootsequence to USB-Stick/Drive (search for an option like Bootsequence, First Boot Device, or something similarly).
-
Insert the USB-Stick and restart your PC. If all went well - MS-DOS starts and you can see the famous DOS-Prompt (C:\>).
-
Now you can start the BIOS update. Remember: it's a good idea to backup the old BIOS version.
Happy flashing!
In other customers shopping cart
Einträge: 91
amir 1.Nov.2023 05:55thanks you
Efrain 2.Mar.2023 18:13Tengo una Lenovo thinkpad L460 pero me equivoque de Bios y ahora no me aparece nada. solo pantalla en negro, ya trate de hacer jumper con la pila del bios y nada, la quite, quite todos los dispositivos y nada, alguien me podria orientar?
biosflash 15.Oct.2022 11:09@Alexander8895
Please read the manual:
https://dlcdnets.asus.com/pub/ASUS/mb/LGA1150/H81-GAMER/e9585_h81-gamer_manual_web_0720.pdf
On chapter 2.1.3 you'll find the recovery function "ASUS CrashFree BIOS 3 utility". You only need a formatted USB pendrive (FAT32 or NTFS) and your wanted bios update file which must be exactly renamed to: "H81GAMER.CAP".
Alexander8895 15.Oct.2022 10:09I have an Asus h81 gamer motherboard, when I start the computer when loading the bios, when I want to press default settings, I want to save it with f10, right after that the uefi bios freezes, then after resetting rtc it does the same thing. I would like to ask how can I update the motherboard bios again and how can I make a bootable flash usb disk if I have already managed to format the usb device to the fat32 file system.?
Abhay 30.Sep.2022 05:26Your are Best I went to shop for repair my bios he said 2500 rupees I was shocked and I see your website instruction thanks you bro
GODSCOOKIES 22.Apr.2020 18:17I have an Acer Aspire 4830TG. Where can I get custom BIOS with UEFI and advanced?.
Alex Reid 27.Jul.2019 12:24Can you advise where I can find the download link to the BIOS for my Samsung Laptop Model RF511 running Windows 10
KileM 27.Jan.2017 16:39Dear Forum members, I have a Toshiba Satellite Pro L300-EZ1521 Part Number PSLB9U-047011 which had is stuck at Toshiba logo. I took out the HDD and attached to another laptop [as an xternal Drive] as a way of testing it. The HDD looks fine as i can view, edit, copy and play music file. I have tried all combinations of keys F2, F12, FN + F, C + Power, 0 + Power with no success. The only keys that seems to work are CTRL + ALT + DEL as it restarts the laptop and CAPS LOCK, FN keys. Could this be a Bios issue. Can this be resolved by BIOS Update/Flash/ Repair?. Your assistance is highly appreciated. Regards, KileM
biosflash 5.Jan.2017 07:00@Kledge
You can use the Tool "RMPrepUSB" to reactivate (blue button) your usb pendrive.
Kledge 5.Jan.2017 06:41Should've read a bit closer and realised that it said in red DO NOT WORK UNDER WINDOWS 10.
biosflash 19.Nov.2016 22:59@wooxt3r
Try UNetbootin to create a bootable Live USB drive with FreeDOS, or use another USB pendrive.
wooxt3r 19.Nov.2016 19:25Hey, i get a constant and annoying error with the software, i select everything i need for the software to create my usb but when i hit "format" i am prompted with the message "Failed to format the drive."
bass@nline 9.Nov.2016 23:54Read your instructions to the letter. I got a desktop custom built with the MSI H55M-P33 mobo (AMI BIOS ver. 1.9) and wanted to update to the 1.10 ver. which adds support for 2.2 TB+ HDD and other new feature. For me it worked. All good. 5 stars. Great walkthrough.
Ifeanyi Ifemeje Kingsley 17.Oct.2016 23:48I was updating my the bios 209 for Asus Zen book N501JW when I lost power and mysystem basically black screen and keyboard not working. Please if anyone could help me I would greatly appreciate it
Rafat Siddique 3.Oct.2016 02:15Hey my laptop having the frozen Dell logo problem and someone suggested me to run this usb Bios program.I wanted to know will it work?please give me the download link.Thank you
biosflash 21.Feb.2016 07:03@Bones
I think, you can answer yourself this question.
Bones 20.Feb.2016 17:32Good day sir. You say to choose the device from which to boot. BUT what if i dont have no video output at all, but PC is runing?
M.Collins 16.Feb.2016 03:35When I tried Winphlash within windows, I got a checksum variable (104) error. Tried a Rufus bootable flashdrive with Winphlash16, but the BIOS ROM file failed to open.
M.Collins 16.Feb.2016 00:27So very close .. followed simple instructions, booted stick into dos, 'PHLASH16 6912.ROM' (Phoenix dos tool).... Utility ran nicely, but stalled on error 'cannot flash with memory managers loaded, HIMEM'. Don't know how to disable HIMEM, any suggestions?
biosflash 1.Dec.2015 06:33@zack
Because the mainboard manufacturer provides these files in a special version for your mainboard model, and i'm no wizard.
Most wanted
BIOS Beeps BIOS Boot CD BIOS Boot Diskette BIOS Boot Logo BIOS Boot USB Stick BIOS Chip installation removal Programming BIOS Chip Type list CMOS Reset BIOS Help BIOS ID BIOS Passwords BIOS Software Tools 3. Start the BIOS Update 4. BIOS Update failed? BIOS Update Howto 2. Choose BIOS Update method 1. Preparation BIOS Updates, Drivers, Manuals, etc. Online Shop
Favorite items


