 BIOS Boot-Diskette - Howto: BIOS-Update per bootable Diskette
A guidance how to create a Boot-Diskette (MS-DOS v6.22) to perform a BIOS update.
see also: BIOS-Update Howto: step-by-step instruction
see also: BIOS Update per bootable USB-Stick
see also: BIOS Update per bootable CD
Important: this method creates a Boot-Diskette for DOS. Due to the size limitation of a 1.44MB floppy disk, you can only use a BIOS file and flashtool whose total file size is max ~1.2MB!
Recommendation: i prefer to use the method BIOS Update per bootable USB-Stick!
A bootable pendrive has no size restrictions and more importantly: you can create a BACKUP before updating the BIOS - and that's always a good idea!
The following tools are needed:
- rawrite - free Floppy image tool, Download from manufacturer's website
- Ultimate BIOS-Boot-Edition:
- floppy.img (the boot image contains only the most important MS-DOS operating system files)
DOWNLOAD Ultimate BIOS-Boot-Edition - 1.2MB - Flashtool - BIOS-Programming-Software (.EXE as file extension), which programs the BIOS file onto the BIOS-Chip, and the BIOS file. Both files must be downloaded:
- Mainboard, bought in its original box: from the mainboard manufacturer website, or
- Notebook or brand PC: from the notebook/brand PC manufacturer website.
Both files must be specially designed for the DOS Operation system! If the manufacturer offers only files for Windows, you have to risk the BIOS update either directly under Windows, or you can re-program your old BIOS-Chip, or purchase a new, programmed BIOS-Chip.
Instruction to create a DOS-Boot-Diskette
- Open the Ultimate BIOS-Boot-Edition and the folder boot_floppy_disk
- Copy the boot image file floppy.img to your hard disk.
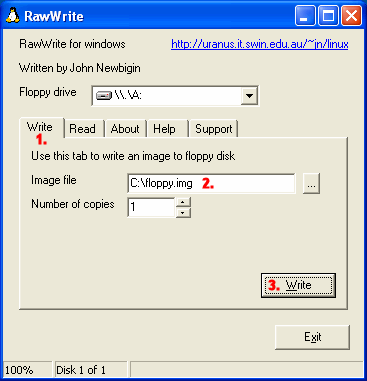
- Start rawrite and choose the menu Write (1.).
- Insert the path (2.) to the boot image file floppy.img.
- Click the Write-Button (3.) to create the bootable DOS-Diskette.
- Close rawrite.
- Rename the filename of your flashtool and the BIOS file, if they have more than 8 characters (not the file extension!).
- Copy your flashtool and the BIOS file onto the diskette.
Starting the BIOS-Update from Diskette
-
First, go into your BIOS-Setup and change the Bootsequence to Floppy/Diskette (search for an option like Bootsequence, First Boot Device, or something similarly).
-
Insert the Diskette and restart your PC. If all went well - MS-DOS starts and you can see the famous DOS-Prompt (A:\>).
-
Now you can start the BIOS update. Remember: you can only backup your old BIOS onto the Diskette if sufficient space is available! But if your harddisk has a FAT16- or FAT32 partition, it would be a good idea to copy your 2 BIOS files to this partition, and to start the update/backup from your harddisk.
Happy flashing!
Einträge: 3
kishan 9.Aug.2023 14:19NEED IT FOR NE BIOS PROGRAM
Rajbeer 20.Mar.2023 08:50Bios tool all software kit
luiz 11.Jul.2011 21:20muito bom!
Most wanted
BIOS Beeps BIOS Boot CD BIOS Boot Diskette BIOS Boot Logo BIOS Boot USB Stick BIOS Chip installation removal Programming BIOS Chip Type list CMOS Reset BIOS Help BIOS ID BIOS Passwords BIOS Software Tools 3. Start the BIOS Update 4. BIOS Update failed? BIOS Update Howto 2. Choose BIOS Update method 1. Preparation BIOS Updates, Drivers, Manuals, etc. Online Shop
Favorite items


